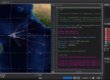
If you’re building a desktop/tabletop interactive projection system, the sensor is the make-or-break component. You need reliable short-range detection (roughly 0.2–4 m), high refresh rate, a wide field of view, practical power and cabling, and a workflow that fits interactive content (projection mapping, coordinate calibration, touch/gesture events).
In many interactive projection projects, people say “radar,” but what they often mean is a Time-of-Flight (ToF) ranging sensor—and ToF LiDAR is a popular choice because it provides stable distance/position data for real-time interaction without relying on ambient light or texture features.
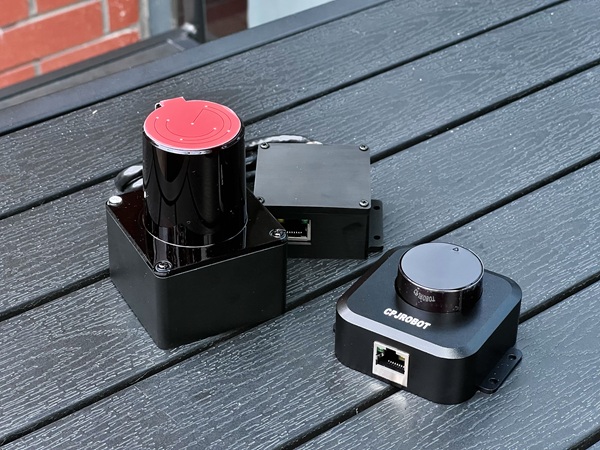
Below is a practical selection guide based on the common tabletop requirements and the positioning of CPJROBOT PoE LiDAR F1 / M1, plus a “kit-style” option (C1) for faster deployment.
What tabletop interactive projection actually demands
A tabletop system is a tight environment: users are close, hands move fast, and occlusion is constant. Your sensor choice should be driven by these constraints:
- Indoor short range: approximately 0.2–4 m usable interaction distance
- High frame rate: enough for responsive touch/gesture tracking (the difference between “playable” and “laggy”)
- Wide field of view (FOV): to cover the table without dead zones
- Installation-friendly: compact size, low power, predictable mounting angles
- Integration-ready: stable output, network/PC compatibility, and a clean path to touch coordinates (your app, Unity, UE, middleware, etc.)
Quick recommendation summary (if you want the decision fast)
- Choose CPJROBOT PoE LiDAR F1 (270°) if your interaction area is mainly a fan/half-circle on one side of the table (for example, a table placed near a wall/screen). It’s simpler to mount and typically more cost-effective for that geometry.
- Choose CPJROBOT PoE LiDAR M1 (360°) if you need full-around coverage (users on multiple sides, center-mounted table experiences, or flexible orientation).
- Consider PoE LiDAR C1 (software kit) if you want a more “solution-style” package to reduce development effort and focus on content and deployment.
CPJROBOT F1 vs M1: how to choose
1) CPJROBOT PoE LiDAR F1 (270° FOV)
Best for: side-mounted or top-edge installation, fan-shaped tabletop interaction zones
Why it fits tabletop projection
- 270° scanning naturally matches “table against a wall” layouts or single-sided user interaction
- PoE + Ethernet simplifies wiring: one cable for power + data
- Intended for interactive projection / interactive device scenarios (tabletop, display-side interaction, kiosk-style deployments)
Where it shines
- Projection tables positioned near a wall or screen
- Tabletop installations where the “active area” is primarily in front of the sensor
- Scenarios where you want less software filtering (because you’re not scanning behind the table)
2) CPJROBOT PoE LiDAR M1 (360° FOV)
Best for: center-mounted designs and multi-user interaction from multiple directions
Why it fits tabletop projection
- 360° scanning supports a more flexible layout: place it near the center or above the table
- PoE/Ethernet keeps deployment clean (especially for exhibits and pop-up installations)
- Works well when you must support interaction from all sides
Trade-offs to plan for
- You may scan areas that aren’t part of the interaction zone (“extra ring” around the table). In practice, you handle this by defining an ROI (region of interest) and filtering in software.
Comparison table: F1 vs M1 vs C1 (kit option)
| Model | Field of View | Typical tabletop range | Power / Interface | Best-fit scenarios |
|---|---|---|---|---|
| CPJROBOT PoE LiDAR F1 | 270° (ToF) | ~0–4 m interaction | PoE Ethernet | Side/top-edge mounting, half-fan tabletop zones, screen-side interaction |
| CPJROBOT PoE LiDAR M1 | 360° (ToF) | ~0–4 m interaction | PoE Ethernet | Center/top mounting, multi-side interaction tables, flexible placement |
| PoE LiDAR C1 (with software kit) | ~270–360° (bundle-dependent) | ~4 m radius class | PoE | Faster deployment with higher software integration, content-focused projects |
Note: Exact frame rate, minimum detectable object size, and output formats should be verified against your project’s responsiveness and detection needs.
Recommended setups for tabletop projection (real-world layouts)
Setup A: Table against a wall (single-sided interaction)
Recommended sensor: F1 (270°)
Mounting idea: on one side of the table, angled slightly downward, covering the active tabletop surface in a fan shape.
Why this works
- You avoid scanning behind the table (less noise, less filtering)
- Calibration is straightforward because the interactive area is naturally bounded
Setup B: Exhibition table with visitors on multiple sides
Recommended sensor: M1 (360°)
Mounting idea: table center (if enclosure allows) or above-table mounting with a defined ROI.
Why this works
- You get consistent interaction regardless of where the user stands
- You can rotate layouts without “re-designing” the sensor geometry
Setup C: “I want minimum development—focus on content”
Recommended sensor: C1 kit
Mounting idea: follow the kit workflow and keep your pipeline simple (calibration → coordinate output → content).
Why this works
- Lower integration burden
- Faster path to a stable interactive demo
Key parameters to confirm before you commit
Table size and sensor position
- If the table only needs interaction on one side: 270° is usually enough
- If users surround the table: 360° is safer and more flexible
Required responsiveness (frame rate) and minimum detectable target
For tabletop interaction, you’re not just detecting “presence”—you’re tracking hands, fingertips, and fast movements. Confirm:
- Practical refresh rate under your intended scene load
- Minimum object size (or minimum reliable “touch blob” size) in your actual mounting height
- Stability when multiple hands overlap or partially occlude each other
Integration approach (what your software stack expects)
A strong sensor can still fail a project if integration is painful. Validate:
- Ethernet/PoE compatibility with your network and PC
- Availability of calibration workflow (mapping sensor coordinates to projector coordinates)
- Output format suitability: point streams, blobs, tracked IDs, or events your application can consume
Multi-sensor expansion
If you anticipate larger tables or multiple zones:
- Confirm how you will unify coordinate systems
- Plan synchronization strategy (even simple timestamp alignment helps)
- Ensure your PoE switch capacity covers total power budget and ports
Practical selection guide (no theory, just choices)
Choose F1 if most of these are true:
- Table interaction is mainly one-sided
- You have a wall/screen on one side
- You want simpler zoning and less filtering
- You’re optimizing for cost and clean installation
Choose M1 if most of these are true:
- Users will interact from multiple sides
- You need center/top mounting flexibility
- You expect frequent layout changes (events, touring exhibits)
- You can handle ROI filtering in software
Choose C1 kit if most of these are true:
- You want to ship a working experience quickly
- Your team prefers content production over sensor algorithm development
- You value bundled tools/workflow to reduce integration risk
Common pitfalls (and how to avoid them)
- Mounting too low or too high: you either lose coverage or lose resolution. Decide your tabletop “active volume,” then mount to match it.
- Ignoring ROI early: especially with 360° sensors, define your interaction boundary first (table polygon), then filter everything else.
- Overlooking PoE and cable routing: PoE is a major advantage—use it properly (quality cables, stable switch, clean grounding in exhibition environments).
- Assuming “any wide FOV works”: the geometry matters. 270° can be ideal if your table is effectively a half-plane interaction zone.
FAQ
Which is better for tabletop projection: 270° or 360°?
It depends on the interaction geometry. 270° is often ideal for single-sided tables or tables against a wall. 360° is better for surrounded tables and flexible placement.
Do I need millimeter-wave radar for tabletop touch interaction?
For fine tabletop interaction, many teams prefer ToF LiDAR because it provides stable spatial sensing suitable for mapping to touch coordinates. Millimeter-wave radar can be excellent for presence and broader gesture detection, but it may require more work to achieve precise multi-touch-like behavior on a table.
Is PoE important for interactive projection installs?
Yes—PoE reduces wiring complexity and makes deployment cleaner, especially for pop-up exhibits, museums, and commercial installations where power outlets aren’t conveniently placed.
You May Also Be Interested In:
Key Performance Indicators for POE LiDAR Interactive Projection Systems